
Info
Bedrock is a block See the various blocks found in Minecraft. For the blocking with shields that reduces damage when performed, see Blocking. All blocks Blocks are the basic units of structure in Minecraft. Contents 1  that is unbreakable in Survival A new Survival game of Minecraft. The health and hunger bars, as well as the hotbar, are visible. See the game mode. For other uses, see Survival (disambiguation). Survival mode is one
  mode. Even so, it is still possible to break the unbreakable in Survival mode without cheats Contents 1 Usage 1.1 Tilde notation 1.2 Target selectors 1.2.1 Target selector variables 1.2.2 Target selector arguments 1.3 Data tags 1.4 Raw JSON text 1.5 Block/item names 2 Summary of commands 3 List of commands . These use glitch and bug exploits to achieve this, so these methods could be rendered useless at any update. Breaking "Punch" redirects here. For the enchantment, see Enchanting#Punch. The Player punches trees and gets wood (click to view animation). Breaking, digging, punching, or mining is one of the most fundamental activities in Minecraft, performed (by
  bedrock is also more difficult than phasing through the bedrock, both of which is covered in this. Note that these methods can also be used to break other unbreakable blocks (though bedrock is the most useful) and regular breakable blocks (the player will not be able to collect any of the blocks broken, and they are much easier to break using tools).
| | The following paragraph demonstrates the use of a bug and/or glitch to make a contraption. Bugs of this nature are bound to be fixed some time in the future: when this happens, the contraption will cease to work. Use at your own risk. |
Why Bother?
It may seem pointless to go through the effort of going through or breaking bedrock Bedrock Transparency No Luminance No Blast resistance 18,000,000 Tool None Renewable No Stackable Yes (64) Flammable No Drops None Data value dec: 07 hex: 7 bin: 111 Name bedrock Bedrock is a block, indestructible by survival means. Contents  , but it is actually quite useful. The most common use of these techniques is to make an easy access point to the top half of the Nether A view of the Nether. The Nether is a hell-like dimension, filled with fire, lava, and dangerous mobs. Contents 1 Accessing 2 Environment 2.1 Mobs 3 Generation 3.1 Naturally generated 3.2 Naturally created 3.3 Structures
  by phasing through the top layer of bedrock and then breaking the bedrock to put up a ladder Ladder Transparency Yes Luminance No Blast resistance 2 Tool Renewable Yes Stackable Yes (64) Flammable No Drops Itself Data value dec: 65 hex: 41 bin: 1000001 Name ladder “ Sometimes the fans are right, too. Like ladders. I
  or elevator Here are some ideas for some Elevators. Contents 1 What is an elevator? 2 Piston Elevator 2.1 Extremely Fast 2.1.1 Trans-location 2.1.2 TNT Cannon 2.2 Multi-floor elevator 2.3 Up and down 2.4 Fast 2.4.1 Zipper
  to the top. Breaking bedrock is also useful if the player wants to fall into the void in the Overworld The Overworld, as seen in an extreme hills and a forest biome The Overworld is the dimension in which all players begin their Minecraft journey. Contents 1 Creation 1.1 Seeds 2 Environment 2.1 Biomes 2.2
  or Nether. It is also useful for breaking some of the blocks on the end gateways End Gateway Portal Biome The End Consists of Bedrock End Gateway Can generate post-generation Yes, when an ender dragon is killed. First appearances See history See the portal created after defeating the
  and the exit portal End Portal Room Biome Any Overworld biome Consists of Mossy Stone Bricks Cracked Stone Bricks Stone Bricks Stone Brick Stairs Iron Bars Lava Silverfish spawner End Portal Frame End Portal Can generate post-generation No First
  in the End See the dimension. For the achievement, see Achievements#The End.. For the advancement, see Advancements#The End. A view of the central End island. The ender dragon can be seen flying around obsidian pillars,
  . These same techniques can also be used to break the frames End Portal Transparency Partial (doesn t block light) Luminance Yes, 1 Blast resistance 18,000,000 Tool None Renewable No Stackable Yes (64) Flammable No Drops Itself Data value dec: 120 hex: 78 bin: 1111000 Name end_portal_frame See
  around the end portal End Portal Room Biome Any Overworld biome Consists of Mossy Stone Bricks Cracked Stone Bricks Stone Bricks Stone Brick Stairs Iron Bars Lava Silverfish spawner End Portal Frame End Portal Can generate post-generation No First in a stronghold Stronghold Portal Room Biome Any Consists of See Structure First appearances See History Strongholds are structures that occur naturally underground, and are primarily important because they house end portals. Strongholds can be located using eyes .
Videos
Phasing Through the Bedrock
This section is about going through the bedrock Bedrock Transparency No Luminance No Blast resistance 18,000,000 Tool None Renewable No Stackable Yes (64) Flammable No Drops None Data value dec: 07 hex: 7 bin: 111 Name bedrock Bedrock is a block, indestructible by survival means. Contents . The only logical reason to do this instead of breaking the bedrock is going up through the bedrock in the Nether A view of the Nether. The Nether is a hell-like dimension, filled with fire, lava, and dangerous mobs. Contents 1 Accessing 2 Environment 2.1 Mobs 3 Generation 3.1 Naturally generated 3.2 Naturally created 3.3 Structures ceiling.
Method 1
This method requires ender pearls Ender Pearl Type Raw materials Durability N/A Renewable Yes Stackable Yes (16) Internal ID PC: 14 PE: 87 Network ID PC: 65 Entity ID ender_pearl First appearances See History Data value dec: 368 hex: 170 bin: 101110000 Name  . It was much easier to do in update 1.8 1.8 Official name Bountiful Update Type Release Release date Sep. 2, 2014 1] Development versions View all Snapshots 14w02a 14w02b 14w02c 14w03a 14w03b 14w04a 14w04b 14w05a 14w05b 14w06a 14w06b 14w07a 14w08a 14w10a 14w10b 14w10c 14w11a
  , but is still possible in later versions.
To use this method, you will need the following materials:
- lots and lots of ender pearls. It is recommended to have at least 8.
Dig up to where the player would be "bumping" its head on the top layer of bedrock (on y = 127 Chart lining up Y-coordinate values (left) to block layers (right). Altitude is a measurement of vertical distance, or distance along the Y-axis. Contents 1 Definition 2 Limits 3 Natural resources and altitude 3.1 The Nether  ). Then, look straight up and throw the ender pearls Ender Pearl Type Raw materials Durability N/A Renewable Yes Stackable Yes (16) Internal ID PC: 14 PE: 87 Network ID PC: 65 Entity ID ender_pearl First appearances See History Data value dec: 368 hex: 170 bin: 101110000 Name as quickly as you can. This is more difficult to do in versions 1.9 and above due to the item cool-down. It works by having one of the ender pearls glitch and teleport the player The Player Health points 20 () Armor points Varies Attack strength Fist: 1 () Items: Varies Size Height: 1.8 Blocks Width: 0.6 Blocks While sneaking: Height: 1.65 Blocks Width: 0.6 Blocks While gliding: Height: 0.6
  into the block such that when the next ender pearl is thrown, it goes above the block and teleports Portal may refer to: Nether portal – the specific formation of obsidian blocks that create the structure used to travel to the Nether. Nether Portal (block) – the purple, indestructible, transparent, vortex-animated block that fills the player to the top of the block.
Pros:
- It is easy to get all the materials needed.
- It is easy to do once you get the hang of it.
Cons:
- It may take many stacks of ender pearls Ender Pearl Type Raw materials Durability N/A Renewable Yes Stackable Yes (16) Internal ID PC: 14 PE: 87 Network ID PC: 65 Entity ID ender_pearl First appearances See History Data value dec: 368 hex: 170 bin: 101110000 Name
 to work.
 - There is a possibility of death The health gauge and monitor in Minecraft is based on a single row of 10 heart icons. Each full heart contains two halves, one hit point each (full health is 20 hit points). Contents 1 due to damage See damage in Minecraft. For information on health/hearts, see Health. Damage represents injury from attacks or natural causes. Players and mobs in Minecraft each have a supply of health points, which are from ender pearls.

Method 2
This method requires that the player The Player Health points 20 () Armor points Varies Attack strength Fist: 1 () Items: Varies Size Height: 1.8 Blocks Width: 0.6 Blocks While sneaking: Height: 1.65 Blocks Width: 0.6 Blocks While gliding: Height: 0.6 has already journeyed to the End See the dimension. For the achievement, see Achievements#The End.. For the advancement, see Advancements#The End. A view of the central End island. The ender dragon can be seen flying around obsidian pillars, and reached the outer End islands.
To use this method, you need the following materials:
- at least 1 chorus fruit Chorus Fruit Type Food Restores 4 () Cookable Yes Renewable Yes Stackable Yes (64) First appearances See History Data value dec: 432 hex: 1B0 bin: 110110000 Name chorus_fruit See the fruit that drops from chorus
- up to 40 stacks of any type of blocks
First, fill in an area that is 17 * 17 blocks by 9 blocks high against the bedrock ceiling. The netherrack Netherrack Transparency No Luminance No Blast resistance 2 Tool Renewable No Yes Pocket edition only] Stackable Yes (64) Flammable No (burns indefinitely when manually ignited, top side only) Experience Smelted: 0.1 Drops Itself Data value dec: 87  and bedrock that generates naturally can be used to fill in this region: only remaining air blocks need to be filled. Once this happens, stand in the middle of the top of this filled-in area (against the bedrock ceiling), and record your coordinates X, Y and Z coordinate on a Minecraft map. Coordinates numerically represent your location in a Minecraft world. They are based on a grid where three lines or axes intersect at the origin point. Players
  . Then, eat the chorus fruit. If the player is not teleported on top of the bedrock, eat another chorus fruit Chorus Fruit Type Food Restores 4 () Cookable Yes Renewable Yes Stackable Yes (64) First appearances See History Data value dec: 432 hex: 1B0 bin: 110110000 Name chorus_fruit See the fruit that drops from chorus
  until you are successful. It works using a chorus fruit`s teleporting ability and removing all other valid places for the player to teleport to.
Pros:
- It can be reversed by placing another region of blocks with 8 blocks in each direction on top of the bedrock ceiling, and then eating another chorus fruit Chorus Fruit Type Food Restores 4 () Cookable Yes Renewable Yes Stackable Yes (64) First appearances See History Data value dec: 432 hex: 1B0 bin: 110110000 Name chorus_fruit See the fruit that drops from chorus .
- It is easy to accomplish.
Cons:
- It requires that the player The Player Health points 20 () Armor points Varies Attack strength Fist: 1 () Items: Varies Size Height: 1.8 Blocks Width: 0.6 Blocks While sneaking: Height: 1.65 Blocks Width: 0.6 Blocks While gliding: Height: 0.6 has already journeyed to the outer End See the dimension. For the achievement, see Achievements#The End.. For the advancement, see Advancements#The End. A view of the central End island. The ender dragon can be seen flying around obsidian pillars, islands to harvest chorus fruit Chorus Fruit Type Food Restores 4 () Cookable Yes Renewable Yes Stackable Yes (64) First appearances See History Data value dec: 432 hex: 1B0 bin: 110110000 Name chorus_fruit See the fruit that drops from chorus .
- The chance of success is random, so it is possible that it will take a huge quantity of chorus fruit Chorus Fruit Type Food Restores 4 () Cookable Yes Renewable Yes Stackable Yes (64) First appearances See History Data value dec: 432 hex: 1B0 bin: 110110000 Name chorus_fruit See the fruit that drops from chorus .
Method 3a
This method is by far the cheapest, but also has the highest chance of death The health gauge and monitor in Minecraft is based on a single row of 10 heart icons. Each full heart contains two halves, one hit point each (full health is 20 hit points). Contents 1 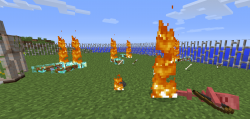 . It has two variations, depending on how quick you are with placing blocks.
To use this method, you need the following materials:
- 1 rail Rail Transparency Yes Luminance No Blast resistance 3.5 Tool Renewable Yes Stackable Yes (64) Flammable No Drops Itself Data value dec: 66 hex: 42 bin: 1000010 Name rail See the standard rail. For other uses, (any kind)
- 1 block See the various blocks found in Minecraft. For the blocking with shields that reduces damage when performed, see Blocking. All blocks Blocks are the basic units of structure in Minecraft. Contents 1 (if needed)
- 1 minecart Minecart Type Vehicles Durability N/A Renewable Yes Stackable No Internal ID PC: 42 PE: 84 Network ID PC: 10 Entity ID minecart Drops Minecart (1) Health points 6 () First appearances See History Data value
- 1-2 ender pearls Ender Pearl Type Raw materials Durability N/A Renewable Yes Stackable Yes (16) Internal ID PC: 14 PE: 87 Network ID PC: 65 Entity ID ender_pearl First appearances See History Data value dec: 368 hex: 170 bin: 101110000 Name
- Helmet Helmet Type Wearable items Durability Varies Renewable Yes Stackable No Data values See Data values Name See Data values This page or section has been suggested to be merged with Armor. Discuss The articles share enchanted with Respiration (recommended but not required)

Dig up to the highest level of bedrock Bedrock Transparency No Luminance No Blast resistance 18,000,000 Tool None Renewable No Stackable Yes (64) Flammable No Drops None Data value dec: 07 hex: 7 bin: 111 Name bedrock Bedrock is a block, indestructible by survival means. Contents ( y = 127 Chart lining up Y-coordinate values (left) to block layers (right). Altitude is a measurement of vertical distance, or distance along the Y-axis. Contents 1 Definition 2 Limits 3 Natural resources and altitude 3.1 The Nether ). Place a block (if needed) two blocks below it, and then place the rail Rail Transparency Yes Luminance No Blast resistance 3.5 Tool Renewable Yes Stackable Yes (64) Flammable No Drops Itself Data value dec: 66 hex: 42 bin: 1000010 Name rail See the standard rail. For other uses,  on top of this block. There should be no gap between the rail and the upper layer of bedrock. Next, place a minecart Minecart Type Vehicles Durability N/A Renewable Yes Stackable No Internal ID PC: 42 PE: 84 Network ID PC: 10 Entity ID minecart Drops Minecart (1) Health points 6 () First appearances See History Data value
  on the rail. This is where it gets dangerous, and where the Respiration-enchanted helmet comes into play. Get inside the minecart and quickly dismount it. The player should be suffocating in the bedrock layer. Next, hold down the "jump" key and throw an ender pearl directly up. In case of this failing, throw another ender pearl directly upward. It works by having the minecart Minecart Type Vehicles Durability N/A Renewable Yes Stackable No Internal ID PC: 42 PE: 84 Network ID PC: 10 Entity ID minecart Drops Minecart (1) Health points 6 () First appearances See History Data value dismount the player in a position where the player will be able to jump and see the top of the bedrock. The ender pearls move the player The Player Health points 20 () Armor points Varies Attack strength Fist: 1 () Items: Varies Size Height: 1.8 Blocks Width: 0.6 Blocks While sneaking: Height: 1.65 Blocks Width: 0.6 Blocks While gliding: Height: 0.6 to the top.
Pros:
- It is very cheap and could be done early in the game.
- It is easy to accomplish.
Cons:
- If the player runs out of ender pearls, he or she is stuck in the bedrock Bedrock Transparency No Luminance No Blast resistance 18,000,000 Tool None Renewable No Stackable Yes (64) Flammable No Drops None Data value dec: 07 hex: 7 bin: 111 Name bedrock Bedrock is a block, indestructible by survival means. Contents ceiling with absolutely no method of escape.
- There is an extremely high possibility of death The health gauge and monitor in Minecraft is based on a single row of 10 heart icons. Each full heart contains two halves, one hit point each (full health is 20 hit points). Contents 1 , and the drops will most likely land on top of the bedrock.
Method 3b
This variation requires an extra rail, an extra minecart, and a fast reaction.
Begin in the same way as in Method 3a: place a minecart under the bedrock ceiling, and begin suffocating in it. This is where the similarities end. From there, the player needs to jump up and down such that they can see the top of the bedrock. Place a rail on top of the bedrock, preferably close to where the player will be coming out. Next, place a minecart on top of the rail and quickly ride it. The player will be teleported to the top of the bedrock ceiling using minecarts.
Pros:
- It is not as dangerous as using ender pearls; only suffocation damage is taken, not fall damage.
- Though uncomfortable, it can be used as part of a minecart elevator to get above the bedrock until the player gets the necessary tools to break the bedrock in their way.
Cons:
- Depending on how close the rail was placed, it can be difficult to place the minecart and get inside it without the minecart being pushed off.
- It is easy to lose the exact location of where the player came up.
Breaking the Bedrock
Breaking bedrock is a very complex and involved process. There are currently three common methods to do this.
Method 1
This method can seem needlessly complex, especially since it will only break one block that is adjacent to the ceiling, and it only works from above. These are the materials you will need:
- 2 sticky pistons
- 2 normal pistons note 1
- 10 redstone repeaters
- 1 activator rail
- 4 cobblestone walls note 2
- 2 TNT minecart note 2
- 10 obsidian
- 2 redstone blocks
- 5 redstone
- 1 lever
- Blocks of any kind for convenience.
Note 1: one of these pistons will be sacrificed.
Note 2: these will explode. Do not plan to get them back.
With these materials at hand, follow the steps below. Pictures are provided at each step because it is easy to make a mistake, which would mean having to start over.
1. Place the 2 sticky pistons perpendicular to each other and facing the block that you wish to remove. In the picture, the block being broken is marked with glowstone above it
2. Three blocks away, diagonally away from the pistons, place the activator rail. Marker iron blocks are placed for convenience.
3. Place obsidian starting from behind the activator rail and going until the closest piston.
4. Place a lever against the obsidian behind the activator rail such that the lever powers the rail.
5. Place 5 repeaters leading away from the lever, a block in front of that chain, and another 5 repeaters going towards the pistons. Set the delay on all of these to their maximum.
6. At the end of this repeater chain, place a block. Place another block behind the closest piston and a redstone between the block and the block behind the piston.
7. Place two cobblestone walls on the remaining two sides of the block above the one that you are trying to break.
8. Place a TNT minecart on the activator rail and flip the lever. Stand back and watch the piston head get blown off. It is crucial that you do not turn off the lever now.
9. Place a redstone block diagonally up from the piston away from the block you are trying to break. Turn off the lever.
10. Place an obsidian block between the two pistons. The redstone should be able to power both pistons at the same time.
11. Repeat steps 7-9.
12. Now that you have two headless sticky pistons, break all of the blocks that you just placed except the headless pistons and the redstone blocks.
13. Place a piston facing down one block away from the headless pistons directly on top of the bedrock. This will require the use of another piston.
14. Break the piston that you used to push the downwards-facing piston into position and place this piston on top of the block you are trying to place, facing upwards.
15. Move to a place where the headless piston on your left is facing the line of normal pistons facing up or down. This will make it easier to understand what is going on if you choose not to follow the pictures.
16. Place a repeater pointing to the upwards-facing piston, one redstone, and then another repeater facing the redstone and parallel to the left headless piston.
17. Place a repeater set to a delay of 2 facing the left piston and two repeaters on the default setting lined up and pointing into the right piston.
18. Connect the repeaters with redstone until you run out. In the missing spot, place a lever and power it.
19. With the redstone lines powered, break the redstone blocks next to the headless pistons.
20. Turn off the lever. All should return to normal, with the sticky pistons getting their heads back, but the downwards-facing piston would have mysteriously disappeared, and there is a hole in the bedrock below the upwards-facing piston.
The way this method works is manipulating the explosion power of the TNT minecart to blow up the head of the piston, but not the base of it, combined with perfect timing, causing the piston to extend at the exact same time as the TNT minecart explodes.
The behavior of the headless pistons is explained in detail on this page. Be that as it may, it does not adequately explain how the pistons break the bedrock. Please help with this on the talk page.
Pros:
- It can be done early in the game, since it does not require many resources.
- It can be done quickly after some practice.
Cons:
- It is insanely complicated, and one mistake means having to completely start over.
- It only breaks one block directly below the setup.
Method 2
This method is much simpler, but it requires more resources. These are the minimum materials you will need to break one block:
- One dragon egg
- One piston
- One redstone torch
- 31-481 redstone note 1
- 33-513 blocks of choice note 1
- 2-32 redstone repeaters note 1
- 1 lever
Note 1: this amount varies greatly on render distance. The amount of redstone you will need is 15 times the render distance. The number of repeaters you will need is the same as the render distance. The number of blocks you will need is 16 times the render distance, plus 1.
This method is incredibly easy to do, but time-consuming. This is all you need to do:
1. Place one block of choice.
2. Place a redstone torch on the side of this block.
3. Place a piston on top of the redstone torch.
4. Place the dragon egg on top of the piston arm. This dragon egg should be exactly above the block you are trying to break.
5. Place the remaining blocks in a straight line with redstone on top of it. Place repeaters every 16 blocks of this redstone line. At the other end of this, place a lever.
6. Power the lever, wait five seconds, then depower it.
7. Walk back to find the dragon egg taking up the space of the broken block.
This works because the dragon egg is dropped in the lazy chunks. Lazy chunks are a region two chunks wide at the edge of the player`s render distance that are partly loaded and have not yet been unloaded. Redstone still works, but falling sand entities fall instantly. Dragon eggs have the strange property where they replace the block they fall on with itself, if they fall in the lazy chunks.
Pros:
- It can be expanded to break more bedrock in one go, if the player manages to obtain more dragon eggs. This can be done using a gravity block duplicator.
- Since it uses a falling block, the player can construct this any number of blocks above the one being broken.
Cons:
- If the dragon egg falls through the bottom layer of bedrock to the void, the dragon egg is gone forever.
- On multiplayer, other players may end up loading the chunks where this is happening, causing it to fail.
Method 3
This method requires a one block deep 1x4 block trench in the bedrock directly above the Nether portal that brought you to the Nether. It only works with the ceiling of the Nether, and requires that there are no other portals with 16 blocks in the Nether or 128 blocks in the Overworld. These are the materials you will need:
Note 1: this amount can change drastically depending on the situation.
1. Place the non-spawnable blocks on every top surface of every block within 16 blocks horizontally and all the way up and down between the bedrock barriers.
2. Break the Nether portal that brought the player to the Nether.
3. Build another Nether portal at least 16 blocks away and use it to travel back to the Overworld.
4. Go back to the original portal and use it to go back to the Nether. This portal should spawn at the Nether ceiling, breaking some more of the bedrock. Repeat this to break more bedrock.
This method works by removing all of the valid places for a Nether portal. It forces the portal to generate in the bedrock, replacing some of it with the obsidian frame.
Pros:
- It is incredibly easy to accomplish.
- It is very fast.
Cons:
- It requires a lot of work to prepare the area.
- It requires the player to have already used one of the methods above to break the bedrock needed to utilize this.
Method 4
This can be done in a variety of different ways because it uses certain plants with block-breaking properties.
Jungle Trees
The branches of huge jungle trees replace blocks that they generate in.
Huge Mushrooms
Huge mushrooms break the blocks that their "hats" spawn in.
Pros:
- These plants are extraordinarily easy to obtain.
- The method is cheap, requiring just a bit of bonemeal.
Cons:
- Plants are unpredictable, so you could be breaking blocks that you did not want to break.
- These plants have very strict space requirements, so fulfilling those and breaking the bedrock can take a lot of trial-and-error.
Method 5
This method requires an indestructible ender crystal and a piston.
To do this, Push the ender crystal with the piston into the block that you want to break. The block will break.
It works because indestructible ender crystals constantly generate fire underneath them. This fire breaks all blocks, including bedrock.
Pros:
- It is insanely easy to accomplish once the materials are obtained.
- Lots of bedrock can be removed quickly with this method, through the use of a flying machine.
Cons:
- Indestructible ender crystals are very difficult to obtain and move.
- It can be difficult to tell which block is being removed.
Fun fact: in the 1.8 update, no bedrock generated on the obsidian pillars because the crystals generated one block lower than they were supposed to. The fire generated broke the bedrock that was supposed to be there.


